GoBoard Point Drain

GoBoard Point Drain Kit

Product Descriptive Name
Shower Pan Drain Kit
Product Short Description
GoBoard Point Drain is fully assembled with an integrated waterproofing membrane and is specifically designed to pair with the GoBoard Shower Pan Kit. The low profile design minimizes curb height and enables curbless installations.

Product Details

GoBoard Point Drain Kit

Product Long Description
GoBoard® Point Drain Kit includes a universal drain body and friction fit universal drain cover riser, and is designed for use with the GoBoard Shower System. The drain body is compatible with numerous brands of both threaded and non-threaded drain cover risers, making the possibilities endless. When used with the GoBoard Wedge, the low profile design of this drain enables curbless installations and also allows for height adjustment based on the thickness of the shower pan tile.

Features

GoBoard Point Drain Kit

Features

Low Profile

Adjustable riser height

Integrated waterproofing membrane

Waterproof Built-in

The GoBoard Point drain complies to IAPMO PS 106, Tileable Shower Receptors and Shower Kits, and ASME A112.18.2/CSA B125.2.

The GoBoard Point Drain Kit includes:

  • Drain cover
  • Drain cover screws
  • Drain riser
  • PVC drain body
  • Clamping collar screws
  • Mixing valve seal
  • Waterproof pipe seal
  • 2" plastic putty knife

Documents

Sign Up for More GoBoard News and Events

Installation

GoBoard Point Drain Installation

LOW PROFILE DESIGN

For use in GoBoard Shower Pan system or mud pans using GoBoard Membrane.

SITE PREPARATION

Walls:

Install 1/2-in (or 5/8-in) GoBoard to wall studs using GoBoard Fasteners spaced every 8-in or GoBoard Washers spaced every 12-in while leaving 1/8-in gaps between the subfloor and bottom edge of GoBoard and all board joints. Fill all gaps with GoBoard Sealant or GoBoard Pro Sealant and spread excess sealant with a putty knife at least 1-in from either side of the joint. For the joint near the subfloor, spread the sealant roughly 2-in up from the subfloor. For more detailed instructions, please visit the GoBoard Tile Backer product page.

WOOD SUBFLOORS

Make sure the floor is level. A level floor is required for proper installation. Measure and find the center of the shower pan area (or as close to the center as the framing will allow). Using these measurements, mark the center of what will be the drain hole. For possible layouts visit the GoBoard Wedge product page.

Cut a 5-in diameter hole with a jig-saw, hole saw, or other means. For remodels, ensure the existing drain location fits within the layouts and dimensions found on the GoBoard Wedge product page. The top of the waste pipe MUST be at least 1 5/8-in below the top of the subfloor. For remodels, cut the existing waste pipe as needed using an inside pipe cutting tool.

Install GoBoard Point Drain body to the waste pipe, and fasten to the subfloor using the provided screws. Use PVC primer and solvent cement to glue the drain body to the waste pipe.

Remove the painter's tape and unfold the membrane to view the waste pipe inside the GoBoard Point Drain body. The waste pipe should be within 1/4-in or less from the fins to ensure a secure and water tight connection.

CONCRETE SLAB SUBFLOORS

Ensure the cement (concrete) slab in the shower pan area is level. Use SLU as needed, in order to level the shower pan area.

Begin by breaking the concrete around the waste pipe to produce a hole that is roughly 5 1/2-in to 6 1/2-in in diameter, around the waste pip. The hole should be centered with the waste pipe. Use a tape measure to ensure the hole size is within this range, measuring in several locations.

Using a speed square and tape measure, continue to dig out the depth of the hole around the pipe. The recommended depth is 3-in while the recommended diameter is 5 1/2-in to 6 1/2-in.

Continue breaking the concrete around the pipe and remove debris as needed with a shop vac. The hole is complete when 3-in depth is achieved at the required hole diameter range.

Using a speed square and permanent marker, mark the exact slab height onto the pipe. Using a hack saw or other means, cut the PVC waste pipe above the subfloor elevation mark you made with the permanent marker. To prevent debris from entering the waste pipe, stuff a cloth inside and below the cutting area. Once the cut is complete, vacuum out the debris and remove the cloth.

Using an inside hole saw and tape measure, carefully mark waste pipe exactly 1 5/8-in below the slab elevation. Cut through the pipe slowly to produce a level cut around the perimeter. Using a file, debur the pipe and clean out all of the remaining debris around and inside the waste pipe.

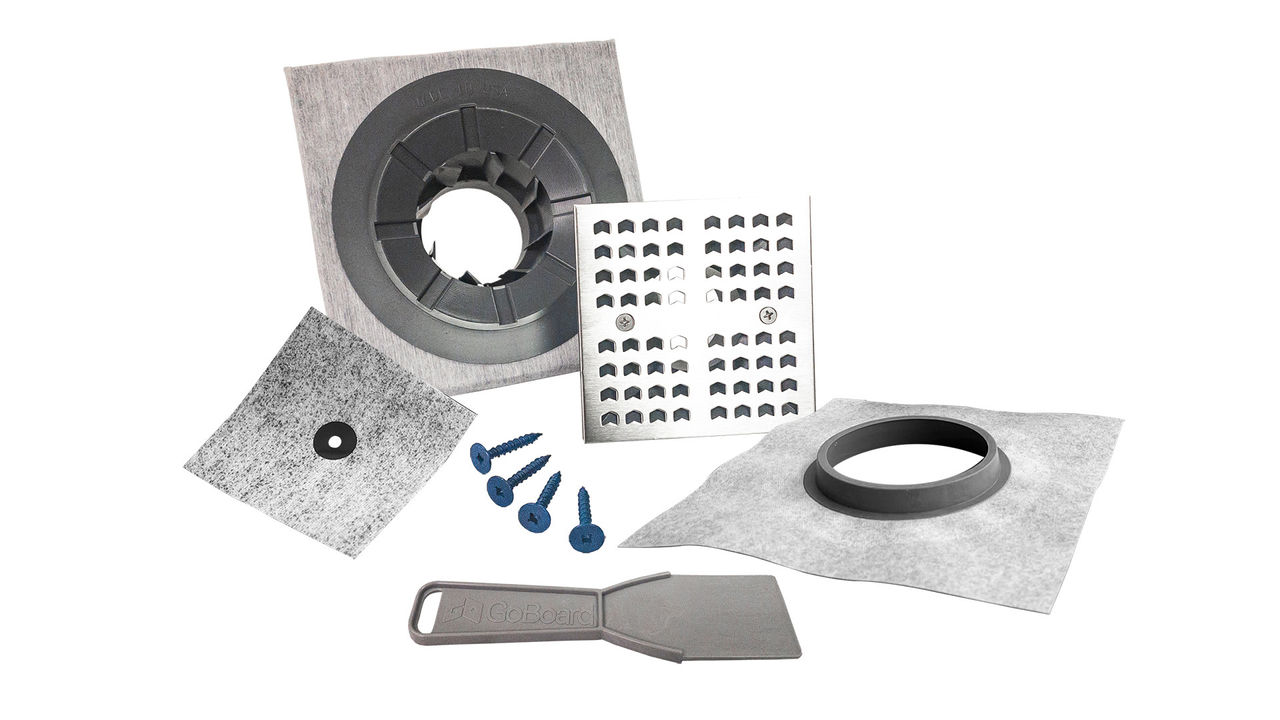
Without adhesive, place the GoBoard Point Drain onto the waste pipe ensuring the square clamping collar rests on the concrete slab and the waste pipe is securely inserted into the drain body. Using a tape measure, properly align the square clamping collar so the edges are parallel with the adjacent walls. Once the drain is positioned properly, mark the proper location by tracing a square around the camping collar with a permanent marker.

Using a margin trowel, apply modified thin-set mortar around the perimeter of the hole leaving enough space for application of the PVC cement (or ABS). Apply modified thin-set mortar to the drain body such that the mortar approximates the volume of the hole around the waste pipe. Use excess mortar so that it will squeeze out as the drain is installed. Modified thin-set mortar with peanut butter consistency works best to prevent sag. Make sure the waste pipe and drain body bonding surfaces are clean.

With all bonding surfaces cleaned, apply PVS (or ABS) cement on the outside surface of the waste pipe and then on the inside bonding surface of the drain body, following the manufacturer's instructions.

Carefully align the drain body with the waste pipe and slowly push the drain body onto the waste pipe. As the drain body is slowly pushed down onto the waste pipe, excess thin-set mortar will begin to squeeze out. At the same time, rotate the drain body such that it is positioned squarely within the square permanent marker outline. Continue pushing the drain body down until the square clamping collar firmly rests on the concrete slab. Remove all excess thin-set mortar from around the perimeter of the drain body.

Unfold the integrated waterproofing membrane to look inside the drain body and double check that the waste pipe is securely inserted inside, such that the pipe is near the fins.

Important:

Make sure the waste pipe cannot be pushed downward during the GoBoard Point Drain assembly installation. There are numerous methods to secure the waste pipe, but the simpest method is to place blocking underneath the drain pipe to achieve the correct distance from the subfloor.

COMPLETE THE INSTALLATION

After installing the GoBoard Wedge panels into the shower pan area using thin-set mortar, fill the 1/8-in gaps with GoBoard Sealant or GoBoard Pro Sealant, including between the clamping collar and the wedge panels. Spread the excess sealant with a putty knife to at least 1-in from either side of the joint. For the 90° inside corners, use a corner putty knife to ensure the inside corners are completely covered and sealed.

SEALING THE DRAIN

After removing the painter's tape and folding the membrane edges up, apply a 1/4-in bead of GoBoard Sealant or GoBoard Pro Sealant on top of the clamping collar and under the membrane. Fill the remaining gaps between the clamping collar and wedge panels, and apply another 1/4-in bead of sealant around the perimeter of the drain body approximately 1-in from the clamping collar.

Unfold the membrane so it's lying flat over the beads of GoBoard Sealant or GoBoard Pro Sealant and the wedge panels. Using a flat putty knife, start spreading sealant underneath the membrane close to the center of the drain and moving outwards. Continue to smooth out the membrane around the drain until the entire membrane is adhered to the wedge panels. Note: Use moderate pressure when smoothing and spreading the sealant underneath the membrane. A continuous layer of sealant MUST remain under the membrane.

Spread the excess GoBoard Sealant or GoBoard Pro Sealant around the perimeter of the membrane. Then apply a 1/8-in bead of sealant around the perimeter of the PVC drain flange and spread with a putty knife. Once the sealant skins over, you may begin tiling.

PLACE THE DRAIN RISER & GRATE

Install the drain cover assembly into the center of the drain. The radial fins are designed to accomodate most 2-in drain cover assemblies while allowing for easy removal and repositioning during tiling. The final height of the drain grate needs to match the height of the installed tile.

Make all necessary preparations for installing tile. Mix thin-set mortar per manufacturer instructions. Using a putty knife, pack thin-set mortar underneath the drain cover assembly.

Begin installing tile around the drain. Using a rubber mallet, gently level the drain cover assembly with the surrounding tile if needed. Set the remaining tile. After the tile installation is complete, grout the enclosure and grout or caulk around the drain riser and grate while ensuring the drain grate remains removeable.


Warranty

HIGH PERFORMANCE - TRUSTED QUALITY

The GoBoard product line includes Polyiso foam board panels, a versatile shower pan kit, and essential tile backer accessories that when installed as a system, can qualify for a manufacturer limited warranty. Need help with one of our products? Contact us with your warranty questions, or download the warranty certificate in the documents above.